
Embedding your schedule on your website
The GymOS sessions widget lets you display your scheduled sessions on your own website. It’s easy to add — just one <div> and one <script> tag — and visitors can browse your schedule, see at-a-glance what’s running each week, and (optionally) click through to book sessions on your FitnessHub member portal site.
This article covers:
- How to add the widget to your site
- Configuration options
- Customising the appearance with your own styles
- Troubleshooting
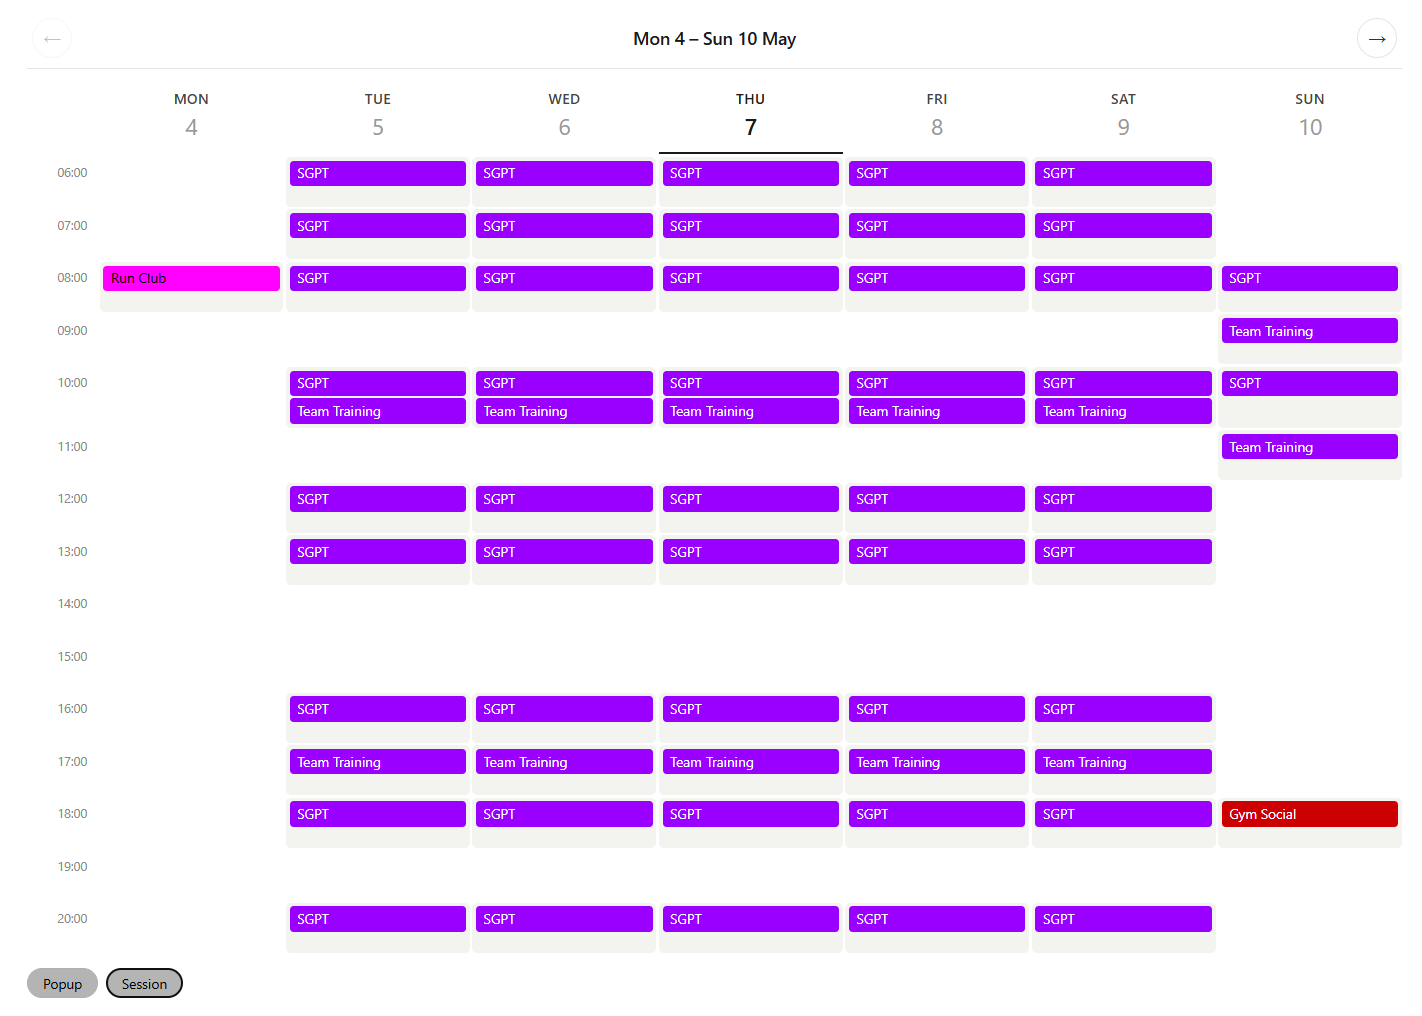
Quick start
Paste this snippet into your website where you want the schedule to appear, replacing [your-customer-shortcode] with your unique customer code and, optionally, including a specific venue shortcode:
<div data-gymos-sessions
     data-client="[your-customer-shortcode]"
     data-venue=""
     data-week="0"
     data-mode="booking"
     data-target="_blank"></div>
<script src="https://my.gymos.com/embed/gymos-sessions.js" async></script>
That’s it. The widget will load with your scheduled sessions for the current week, and visitors can navigate forwards through future weeks using the arrow buttons. If a venue shortcode has been provided, the schedule will be filtered to that venue’s schedule.
You only need to include the <script> tag once per page, even if you have multiple <div> widgets on the same page.

Configuration options
All configuration goes on the <div> element via data- attributes.
data-client (required)
Your unique customer shortcode, found in the System IDs report (see above). This identifies whose schedule to display.
data-client="aBcd3Ef"If the code is missing, invalid, or your account is inactive, the widget will display “Schedule unavailable”.
data-venue (optional)
The unique venue shortcode for the venue whose schedule you wish to display, found in the System IDs report (see above). This filters the schedule to that for the chosen venue. If left undefined, all scheduled events across all your venues will be displayed.
data-venue="U6Gh3T"If the code is missing, or invalid the widget will display the schedule for all venues.
data-mode (optional)
Controls whether the widget acts as a read-only schedule display or as an entry point to your booking system.
| Value | Behaviour |
|---|---|
booking (default) | Sessions are clickable. Each pill links to your FitnessHub member portal booking page for that session. Past sessions are greyed out and not clickable. |
display | Read-only schedule. No links, no past-session greying. Hover tooltips still show session times for visitor information. |
data-mode="display"Use display mode for a public marketing or “what we offer” view of your timetable. Use booking mode where you actively want visitors to book.
data-week (optional)
The starting week to display. Defaults to 0 (the current week).
| Value | Behaviour |
|---|---|
0 (default) | Current week (Monday to Sunday) |
1 | Next week |
2, 3, … | Subsequent weeks |
Visitors can navigate forwards and backwards from this starting point using the in-widget arrows. They can never navigate before the current week, and can only navigate forward as far as your scheduled data allows.
data-week="0"data-target (optional)
Controls how booking links open when clicked. Only applies in booking mode.
| Value | Behaviour |
|---|---|
_self (default) | Opens in the same tab |
_blank | Opens in a new tab |
html
data-target="_blank"Most websites benefit from _blank so visitors don’t lose their place when clicking through to book. If you’d prefer the booking page to replace the current page, omit this attribute or set it to _self.
How visitors interact with the widget
Hovering or focusing on a session pill reveals a tooltip showing the precise start times for each individual session in that group. For example, a pill labelled “Small Group PT ×4” shows all four start times. Each time is individually clickable in booking mode.
Clicking a pill in booking mode opens the booking page for the first session in that group. If the visitor wants a specific session in a multi-session pill, they can hover to see all the times and click the one they want.
Clicking the filter chips at the bottom of the widget toggles whole categories on and off. This is useful when a visitor only wants to see (for example) sessions, not popups. Filter selections persist across week navigation.
Clicking the arrow buttons in the header navigates between weeks. The previous-week button is disabled when viewing the current week. The next-week button is disabled when there is no further scheduled data.
On mobile devices (screens narrower than 600px), the widget shows two days at a time (today and tomorrow by default) with arrow controls to navigate to other days. The week navigation continues to work the same way.
Customising the appearance
The widget ships with a clean, neutral default appearance designed to suit most websites. If you want to match your site’s branding more closely, you can override any of the visual properties by adding CSS variables to your own stylesheet.
How customisation works
The widget uses CSS custom properties (also called CSS variables) for all of its colours, spacing, and typography. To override any of them, add a CSS rule targeting .gymos-sessions and set the variable to your preferred value. Your stylesheet must load after the widget’s own styles — which it normally does as a matter of course — for your overrides to take effect.
A simple example:
.gymos-sessions {
  --gymos-radius: 8px;
  --gymos-cell-bg: #fff5e6;
}
This would change the corner radius of all elements to 8px and tint the cell backgrounds with a warm cream colour, while leaving everything else at its default.
Available variables
Layout and spacing
| Variable | Default | Description |
|---|---|---|
--gymos-grid-gap | 2px | Space between cells in the grid |
--gymos-radius | 4px | Corner radius for cells, pills, and panels |
--gymos-cell-min-h | 40px | Minimum height of each grid cell |
Colours
| Variable | Default | Description |
|---|---|---|
--gymos-cell-bg | #f3f3f0 | Background colour of session cells |
--gymos-cell-empty-bg | transparent | Background of empty cells (no sessions) |
--gymos-time-fg | #888 | Text colour of the time labels (06:00, 07:00, etc.) |
--gymos-day-fg | #444 | Text colour of day-of-week headers |
--gymos-day-num-fg | #999 | Text colour of date numbers in headers |
--gymos-day-today-fg | #1a1a1a | Text colour for “today” emphasis |
--gymos-border | rgba(0,0,0,0.1) | Border colour for week-nav and other divider lines |
--gymos-tip-bg | #1d1d1f | Background colour of the hover tooltip |
--gymos-tip-fg | #fff | Text colour inside the hover tooltip |
--gymos-nav-fg | #333 | Icon colour for week navigation arrows |
Typography
| Variable | Default | Description |
|---|---|---|
--gymos-font | inherit | Font family. By default, inherits from your site’s font. |
Note: Pill background colours are not configurable via CSS variables. Each session category has its own colour set in your GymOS admin panel — these flow through automatically. Text colour on pills is calculated automatically for readability against whichever background colour you’ve chosen.
Examples
Match your brand’s primary corner radius and font:
.gymos-sessions {
  --gymos-radius: 12px;
  --gymos-font: "Poppins", sans-serif;
}
Dark theme:
.gymos-sessions {
  --gymos-cell-bg: #2a2a2e;
  --gymos-day-fg: #ddd;
  --gymos-day-num-fg: #aaa;
  --gymos-day-today-fg: #fff;
  --gymos-time-fg: #888;
  --gymos-border: rgba(255,255,255,0.1);
  --gymos-nav-fg: #ddd;
}
Tighter, denser layout:
.gymos-sessions {
  --gymos-grid-gap: 1px;
  --gymos-radius: 2px;
  --gymos-cell-min-h: 32px;
}
Where to put your CSS
You have a few options:
- In your site’s main stylesheet. Just add a
.gymos-sessions { ... }block. Simplest for sites you control. - In a
<style>tag in the page’s<head>above where the widget loads. Useful for pages where you only want to override on that specific page. - In a
<style>tag right before the widget’s<div>. Works the same way and keeps the customisation visually close to the widget in your source code.
All approaches load after the widget’s own styles (which inject themselves on first load), so your overrides will always take precedence.
Multiple widgets on a page
You can include multiple GymOS widgets on the same page — for example, a “this week” widget and a “next week” widget side by side, or display mode in one section and booking mode in another. Just include multiple <div> elements with their own configuration:
<h2>This week's classes</h2>
<div data-gymos-sessions
     data-client="your-client-code"
     data-mode="display"
     data-week="0"></div>

<h2>Next week's bookable sessions</h2>
<div data-gymos-sessions
     data-client="your-client-code"
     data-mode="booking"
     data-week="1"
     data-target="_blank"></div>

<script src="https://my.gymos.com/embed/gymos-sessions.js" async></script>
The script tag only needs to appear once.
Troubleshooting
The widget shows “Schedule unavailable”
Most commonly this means your customer shortcode is incorrect, mistyped, or your GymOS account is inactive. Double-check the data-client value matches what we provided you. If you’re sure the code is right, contact our support team.
The widget shows “Loading schedule…” and never finishes
Check the browser’s developer tools (press F12) and look at the Network and Console tabs. You may see:
- A failed request to
my.gymos.com— check your internet connection or any firewall/security rules that might be blocking the request - A CORS error — this would indicate a configuration issue on our side; please contact support
- A JavaScript error in the Console — share this with our support team
The widget appears but is unstyled
This usually means your site’s CSS is overriding the widget’s styles too aggressively. Check if you have any global selectors like * { ... } or div { ... } that might be affecting the widget. Adding more specific CSS targeting .gymos-sessions in particular may help.
The widget looks fine on desktop but cramped on mobile
The widget automatically switches to a 2-day mobile view below 600px wide. If you’re seeing the full 7-day grid on a phone, your site may be setting a wider viewport than the device width — check your <meta name="viewport"> tag. The standard tag should be:
html
<meta name="viewport" content="width=device-width, initial-scale=1">Changes I made in my GymOS admin don’t appear in the widget immediately
The widget caches schedule data for up to 10 minutes for performance. Most edits will appear within that window.
Need help?
If you’re stuck or need guidance implementing the widget for your site, please raise a support ticket.