Sharing document library files with members
Once files and folders have been added to the document library, they may then be shared with members. There are many different ways to do this, each suited to various needs and contexts — some manual, while others are fully automated.
The methods include:
- Ad hoc to a given member, via the member record
- To individuals, groups, or memberships from the document library
- Via a nurture program
- By an event trigger

Having allocated a file/folder to a member(s), you might need to revoke the access at a future point.
Allocating a file to a member ad hoc
If you wish to manually allocate a specific file from the document library to a member, you have two options for doing so.
The first method is available from the Share File/Folder option in the document library, outlined below.
The second method is from the Documents Tab of the member record:
- From the Add new… drop-down menu, select Add from library. This will open the Add from Library pop-up window:
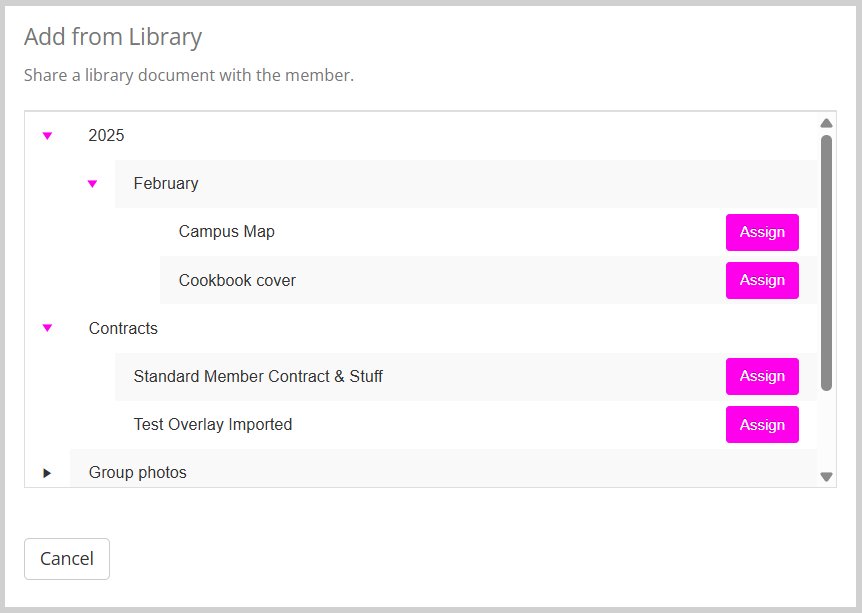
- Navigate the expandible document tree to locate the file that you wish to allocate.
- Click the Assign button next to the file, which will immediately be assigned to that member.
Note: You cannot allocate folders to members using this method, but can do so using the Share File/Folder option from the document library (see below).
Sharing a file or folder from the document library
When manually allocating files or folders to members, a broader set of options are available from the Share option in the document library itself:
- Select Document Library from the Libraries option on the main navigation menu.
- Navigate the library to locate the folder/file that you wish to share.
- Click the Share Folder/File option alongside the folder/file that you wish to share. The share pop-up window will appear, with the context varying slightly depending on whether you are sharing a folder or a file:
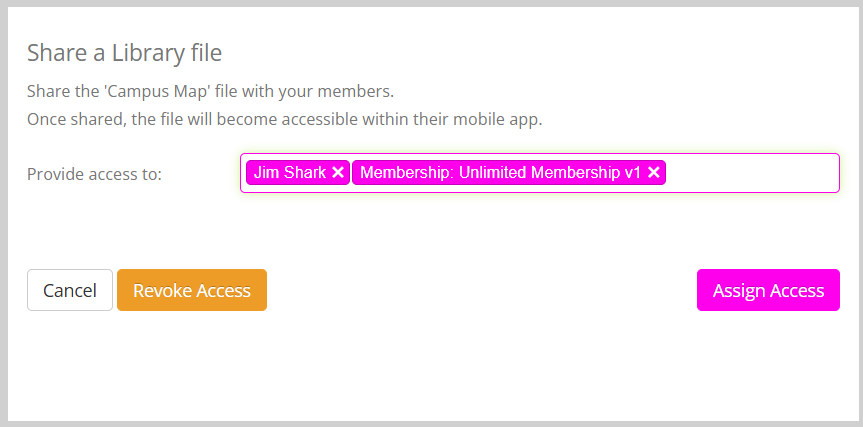
- In the Provide access to box you may enter one or more of:
- Member name(s)
- Membership name(s)
- Group name(s)
- Clicking the Assign Access button will assign access to the folder/document for all of the members or members of the groups/memberships you selected.
Via a nurture program
It is possible to allocate a document or folder to a member as part of a nurture program using the Add a library document(s) action.
This process is described in more detail in the Nurture Program Steps article.
By an event trigger
The Library Document action step within Event Triggers enables you to assign a document or folder to a member as part of a triggered workflow.
This process is described in more detail in the Trigger Steps article.
Revoking access to a file or folder
The method for revoking access to a file or folder depends on the process and means by which you allocated the file/folder.
- If you delete a file or folder from the document library, it is also deleted from the members, regardless of the allocation method.
- If you have allocated a file or folder to a group, and the member ceases to be a member of that group, they lose access to the file/folder. That is, unless they have been granted access to that file/folder through an alternate assignment (E.g. a membership).
- If you have allocated a file or folder to a membership and the membership ceases to exist, the members lose access to the file/folder. That is, unless they have been granted access to that file/folder through an alternate assignment (E.g. a group).
- If you have allocated a file or folder on a group or membership basis, you cannot revoke access to an individual within that group or membership. The allocation is group- or membership-wide and non-exclusive.
The revocation method is, similar to the share method outlined above. At first, it may feel slightly counterintuitive.
- Select Document Library from the Libraries option on the main navigation menu.
- Navigate the library to locate the folder/file for which you wish to revoke access.
- Click the Share Folder/File option alongside the folder/file for which you wish to revoke access. The share pop-up window will appear, with the context varying slightly depending on whether you are sharing a folder or a file:
- In the Provide access to box you may enter one or more of the groups/people from whom you wish to revoke access:
- Member name(s)
- Membership name(s)
- Group name(s)
- Clicking the Revoke Access button will revoke access to the folder/document for all of the members or members of the groups/memberships you selected.
Note: Members can download files shared with them. If a member has downloaded a file to their device, revoking access does not (and cannot) remove that file from their device.