Bulk importing members into GymOS
You may bulk import member data into GymOS. Typically, this is something you would do only once, at the commencement of your move to GymOS.
To import member data into GymOS:
- Ensure you have completed configuring the main GymOS functions, such as memberships.
- Download the member import template, attached to the end of this article (scroll down).
- Extract the member data from your current system.
- Add the member data to the import template, ensuring you heed the guidelines below.
- Select Bulk Import from the Settings section of the main navigation menu.
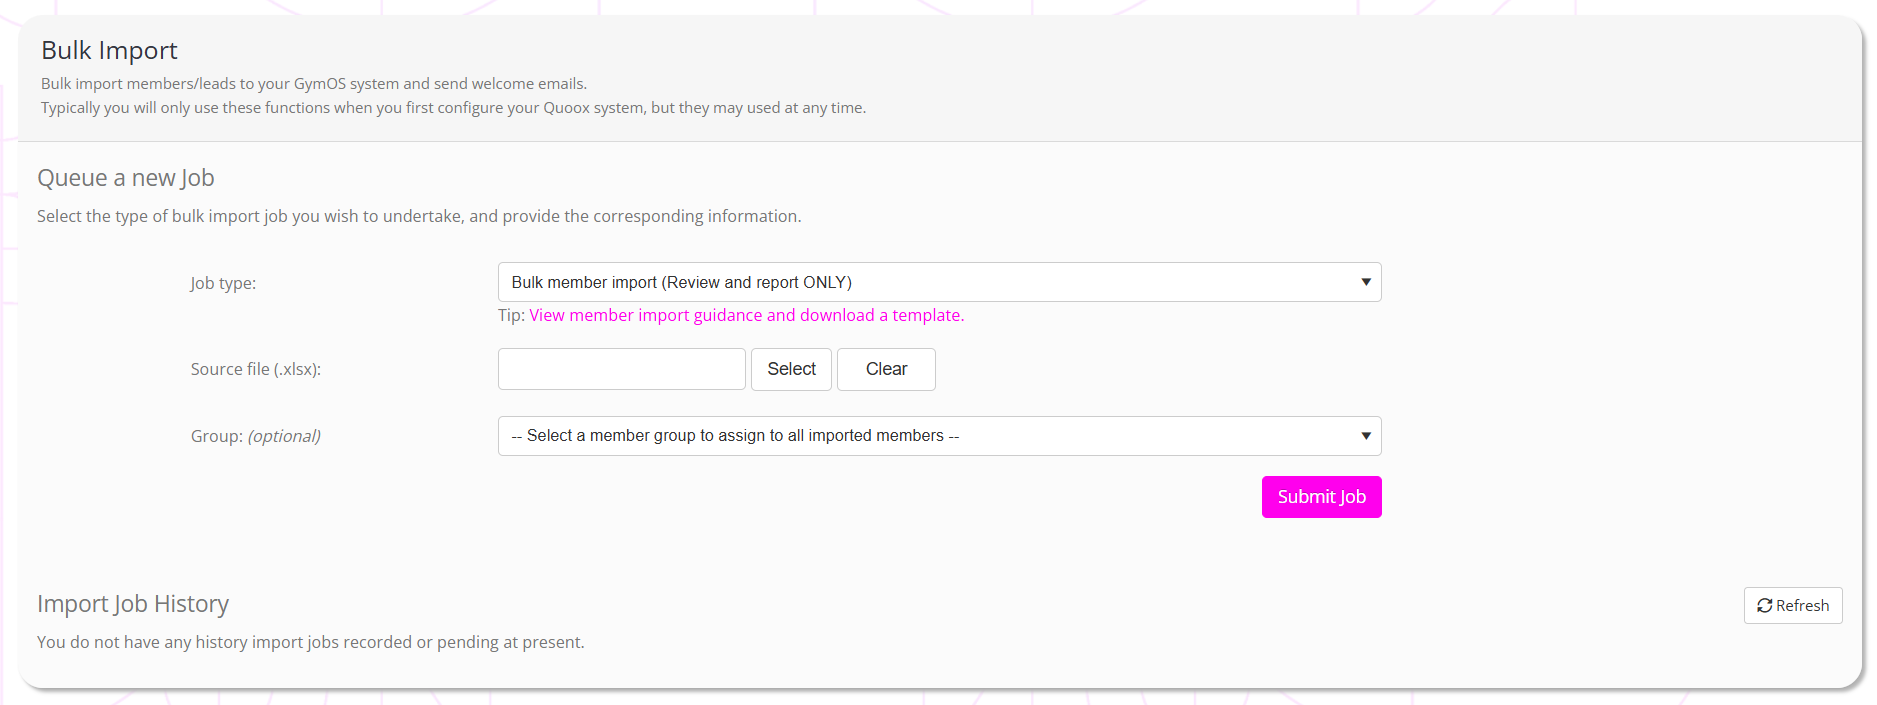
- From the Job Type option, it is recommended you first select Bulk member import (Review and report ONLY)
- In the Source file (.xlsx) box, select the member import spreadsheet that you have populated.
- Optionally, select a member group to assign to all of the members you are importing.
- Click the Submit Job button.
GymOS will commence processing the import as a background task. You can click the Refresh button to track progress.

- Once the job has completed, check the status.
- From the Select drop-down in the Actions column, select View Process Log to determine the cause of any errors. Remedy these accordingly.
- Once you have had a successful test run, click Re-run and import records option to reprocess the import, but this time actually adding the data to the system.
- Verify that the import has completed successfully and that the data is as you wish. If you need to remove data and re-run, you can select the Delete imported members option from the Select drop-down in the Actions column.
- Finally, if/when you want to send the system welcome emails to the members you imported, select the Send welcome emails option from the Select drop-down. Note: The template used is the one called Members: Welcome email (as used by bulk import process)
Note: Bulk imports do not fire triggers or any other functions. The process is a safe, controlled, static import.
Filling in the template
For us to be able to import your data successfully, it is important that you heed the following:
- The columns must remain titled as per the spreadsheet.
- The columns must remain in the order as per the spreadsheet.
- You cannot add or remove columns to the spreadsheet.
- The spreadsheet includes an example row, which you should remove.
- At a minimum each row must include a first name and last name. All other columns/fields are optional.
- Mobile and email addresses must be unique. You cannot have two members with the same contact details. If you need to set up “families“, leave the mobile/email for these members blank, and set up the family linkage once imported.
- Do not put landline numbers in the mobile phone field. These must be mobile numbers only, as they are used for sending SMS messages.
- Valid entries for the title field are: Mr; Mrs; Miss; Ms; Dr; Mx; or blank
- Valid entries for the gender field are: M; or F
- Date of birth (DOB) should be in the format dd/mm/yyyy
- Joined date is optional but, if provided, should be in the format dd/mm/yyyy
- Mobile numbers should either be a valid format for your country (E.g. 07803 123456), or fully qualified international numbers (+44 7803 123456)
- Data will be imported with the capitalisation provided, so we suggest taking a few minutes to make sure your data is “clean” and correctly presented.
- Email address is a pre-requisite to log into the GymOS FitnessHub app, so only members with email addresses can use the FitnessHub app and be sent a welcome email.
- The Emergency Contact details are optional.
- Notes are optional but, if provided, will be created as a note entry on the documents tab of the member record.
- The member creation date will be set to the date of the import.
- The GDPR and marketing acceptance fields will be set automatically, and thus you should ensure you have permission to import the data you provide us.
- The “Previous Unique Id” field may optionally be used to record the unique ID that was assigned to the member in your previous management system.
- The “Default Venue” field is optional. If populated it should exactly match the name of a venue you have configured in GymOS. If left blank, the first available venue will be assigned.
Membership field notes
As part of the import, you may have GymOS optionally create a membership record for the member. The following notes apply to the membership fields within the import template:
- To create a membership, the membership type; membership plan; membership start date; and membership payment method fields must be completed.
- At the start of the import, the membership types and plans entered are validated against those that have been setup in GymOS.
- The membership type name must exactly match the name of the membership type setup in GymOS (including any punctuation)
- The membership plan name must exactly match the name of the membership plan setup in GymOS (including any punctuation), and the plan must be defined under the membership type provided.
- The start date must be a future date. You cannot add a membership to start prior to the import date.
- The valid entries for the payment method are:
- Card
- DirectDebit
- BankTransfer
- Cash
- Cheque
- Credit
- Other
- The payment method values are capitalised and punctuated as listed, and do not contain any spaces. (I.e. the correct method “DirectDebit” not “Direct Debit”)
- You may optionally provide a “Membership Override Recurring Price”. This will be used instead of the recurring cost on the membership plan.
- The override price should be left blank to use the membership plan price
- The override price should be a decimal number and should not include any currency symbols or other text
- The membership will be created with grace credits enabled.
- The membership auto-renew will be set as per the membership plan.
Your members are able to update their information and complete missing information from within the GymOS FitnessHub mobile app.
We are here to help you get set up with your system. If you have any questions, please ask us.