Creating or amending a form
New forms, questionnaires, contracts, PAR-Qs, and other similar data-gathering documents are added within the Forms & Questionnaires administration area.
Creating a new form
To create a new form for use with members or leads, follow these steps. We will start by defining the form and then proceed to adding questions.
Defining the form
- Select Forms & Questionnaires from the Connect and Promote section of the main navigation menu. This will open the forms listing page.
- Click the Add Form button. This will open the Configure Form window.
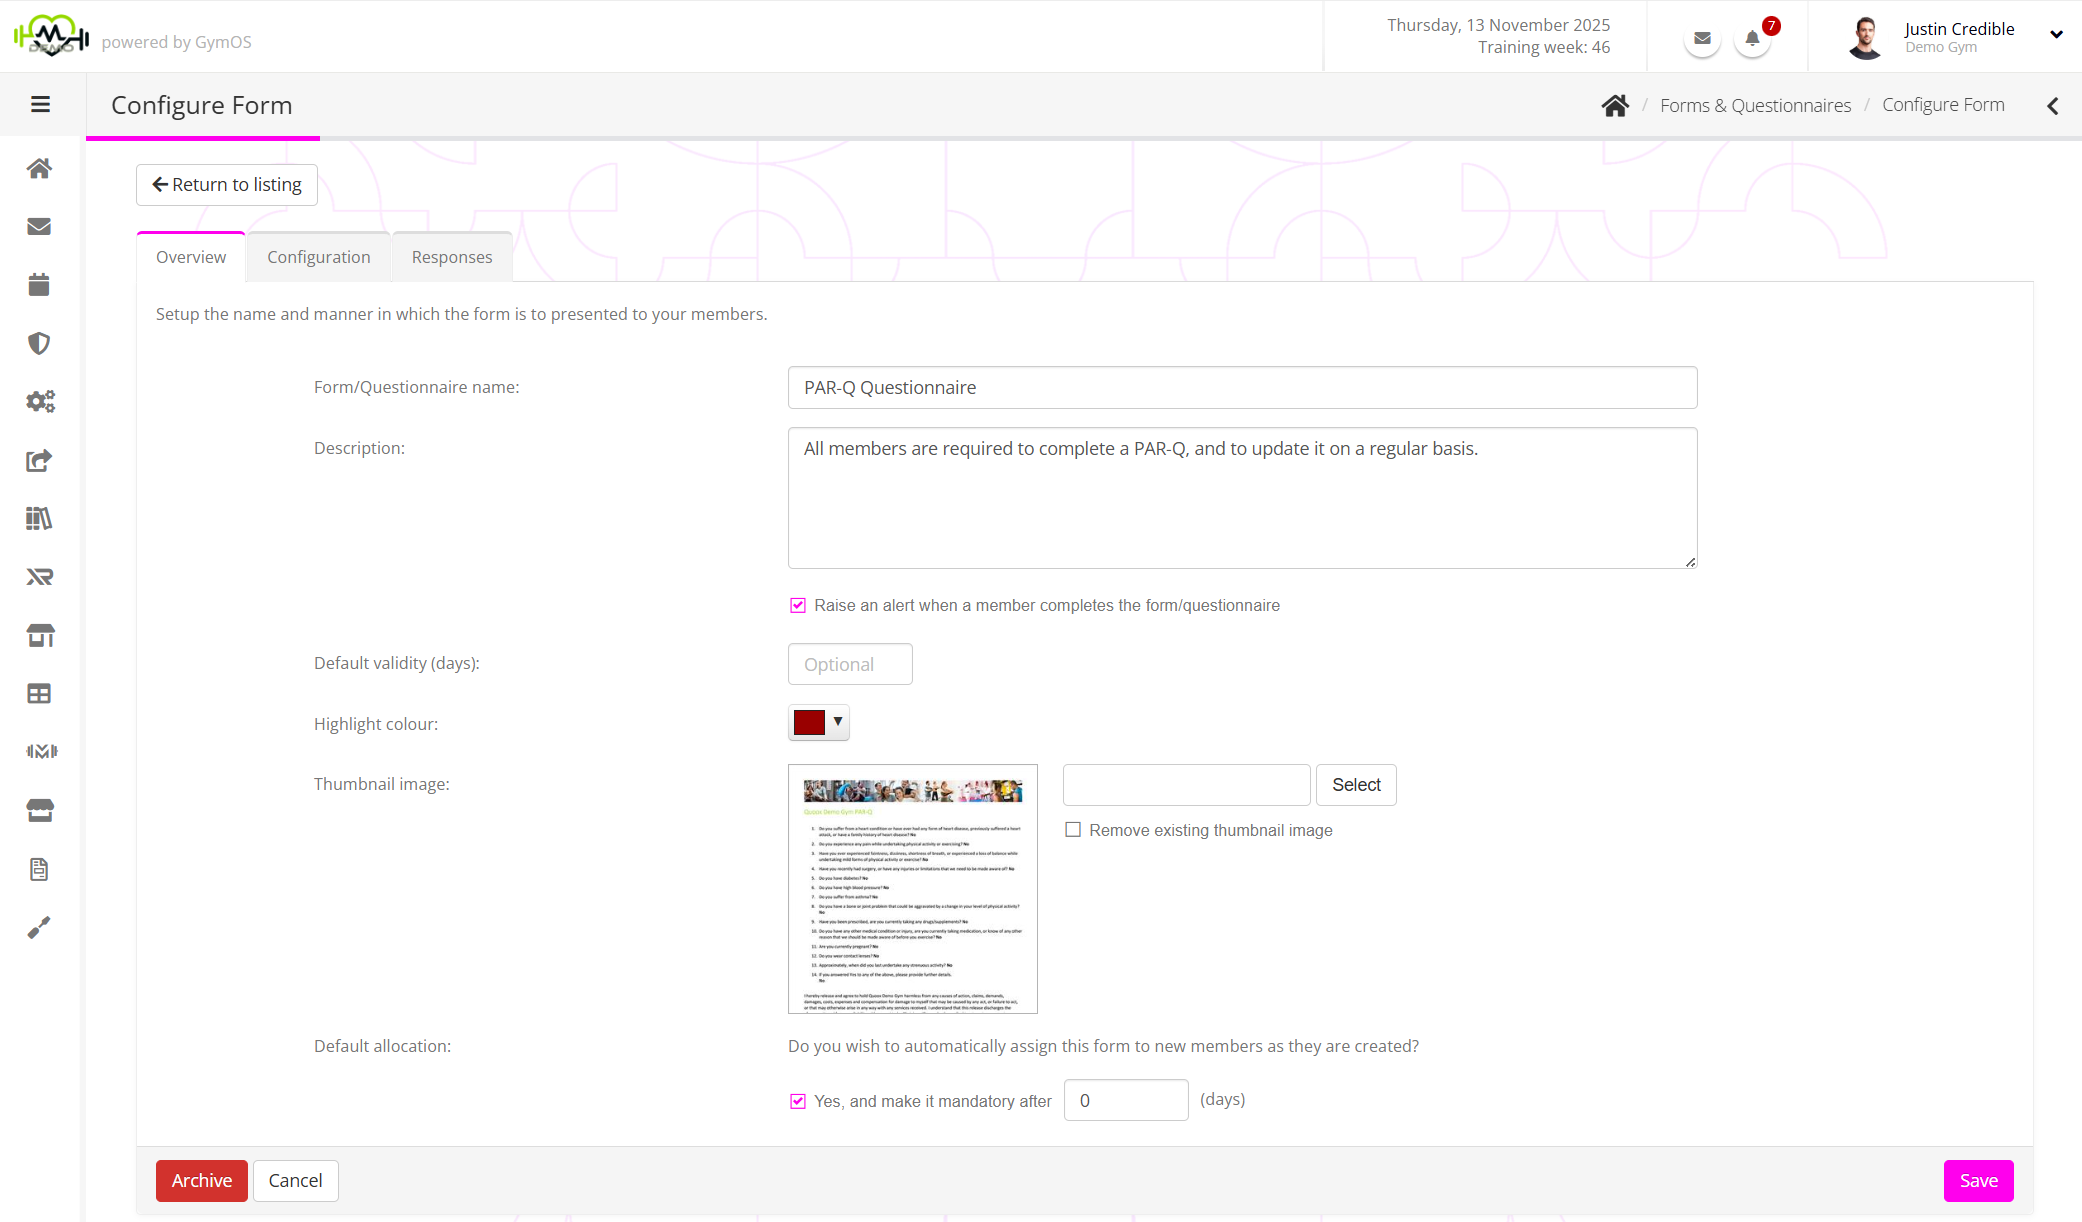
The Overview tab of the form is where you provide the basic details of the form, before moving on to adding questions.
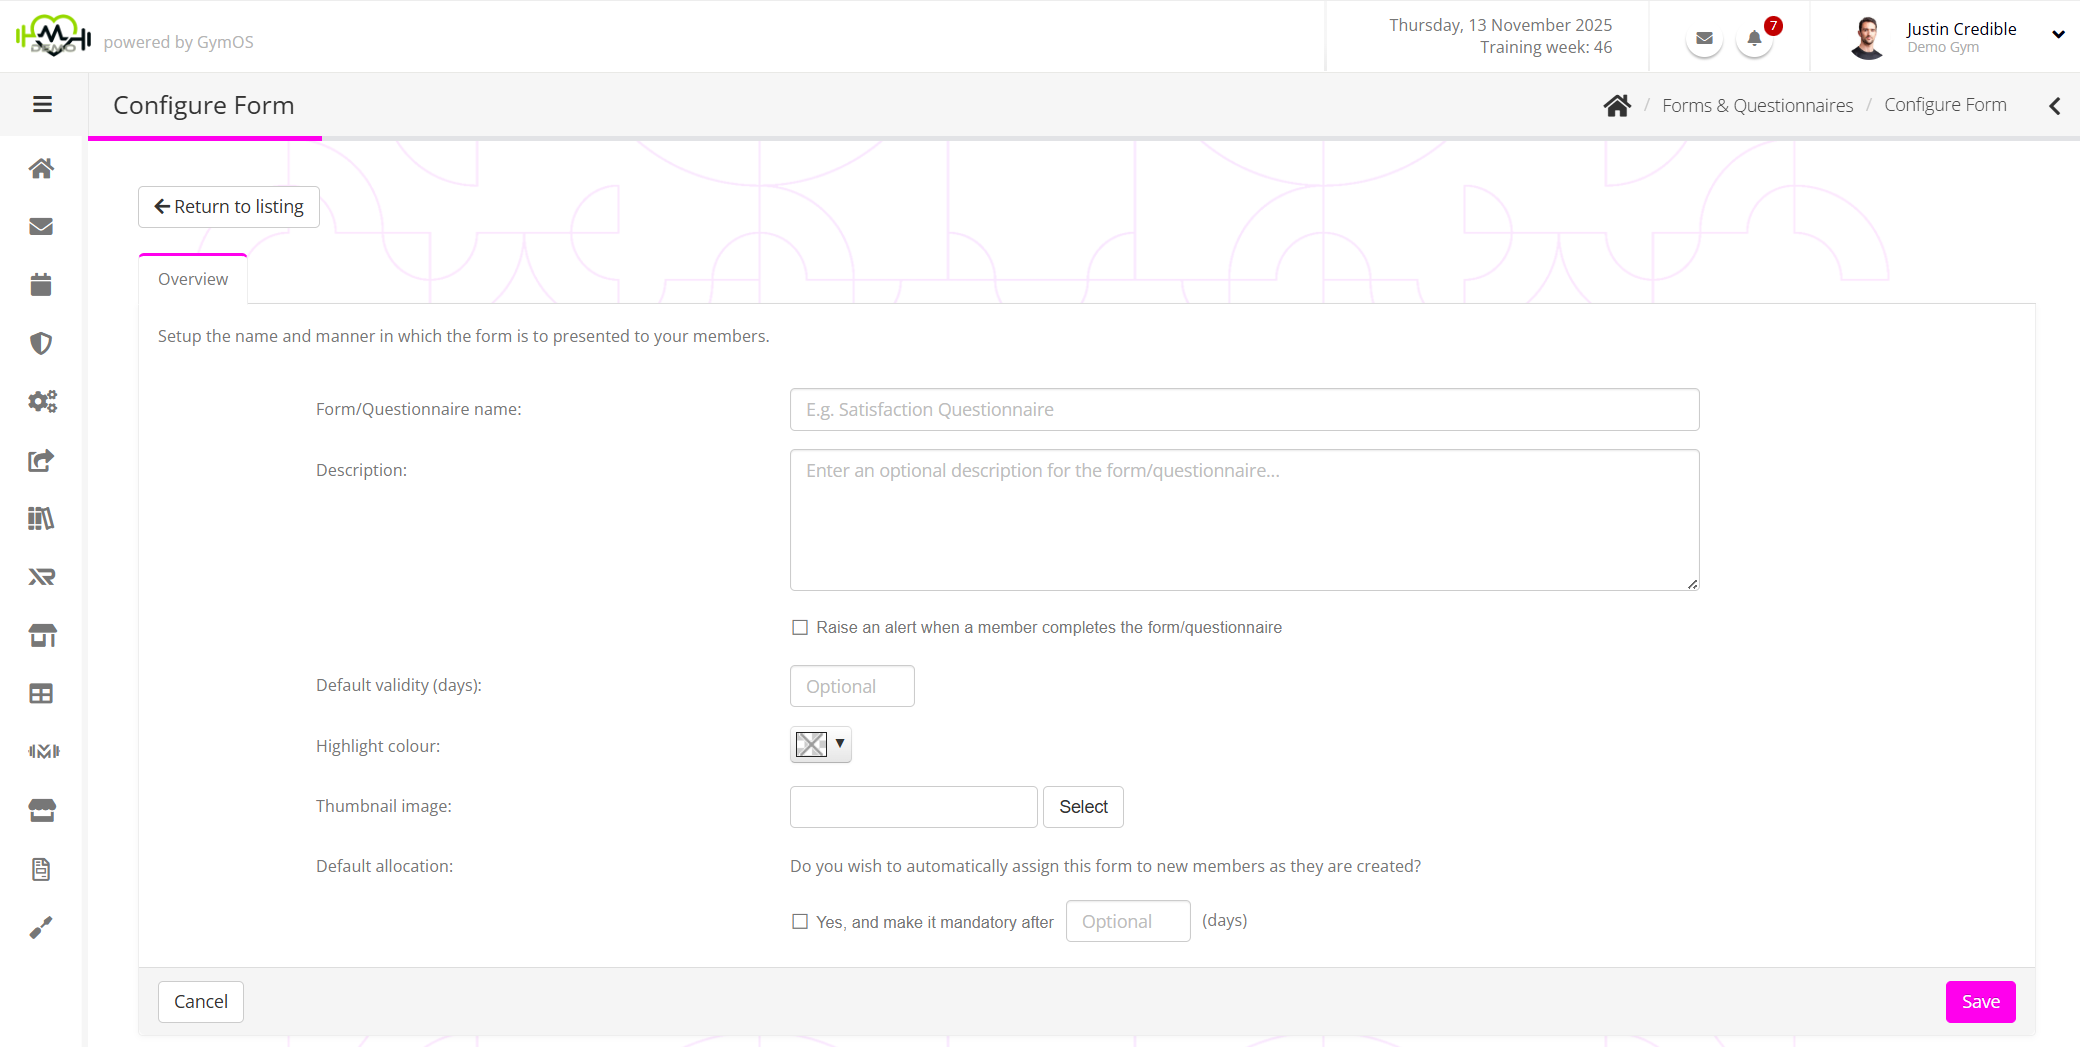
- Complete the form, providing the Form/Questionnaire name as the absolute minimum.
Form/Questionnaire name
A meaningful name of the form, which is also visible to the person to whom it is allocated. (E.g., “Membership Contract”)
Description
An optional description to add to the form. This is also displayed to the person to whom it is allocated. (E.g., “This is your membership contract with us. It outlines our terms of business, our provision of service, and what you agree to by taking a membership with us.”)
Raise an alert when a member completes the form/questionnaire
This is a high-level action which, when checked, will raise an alert in the System Alerts area each time the form is completed.
Default validity (days)
An optional setting which provides a means for revoking incomplete forms after a given number of days. This is useful if you issue forms on a scheduled basis and don’t want the member’s account to be cluttered with incomplete forms. For example, if you issue a form every 28 days, you could set the default validity to 28 days. As one form is issued, the previous form expires (if incomplete).
Highlight colour
If you issue a fair number of forms, this optional colour may help respondents find the form more easily amongst a list. For example, you could colour your check-ins blue.
Thumbnail image
You may optionally upload a thumbnail image to the form. This is displayed to the member or lead and is purely for cosmetic reasons. The image should be a jpg or png file, square in aspect ratio, and a maximum of 1Mb in size.
Default allocation
Checking the “Yes” box will automatically allocate the form to all members as soon as their member record is created.
Additionally, you can specify the number of days after which the form becomes mandatory. For example, you might choose to make a PAR-Q mandatory after 7 days. If the member does not complete the form within that time, they cannot make any new session bookings.
Note: a value of 0 makes the form mandatory immediately. Leave the box empty if you do not want the form to become mandatory. - Click the Save button to create the base form. The form will be created, and the page will reload with the Configuration and Responses tabs visible.
Adding questions to the form
Having created the base form definition, you can now move on to add one or more questions to the form. To access the form questions, click the Configuration tab.
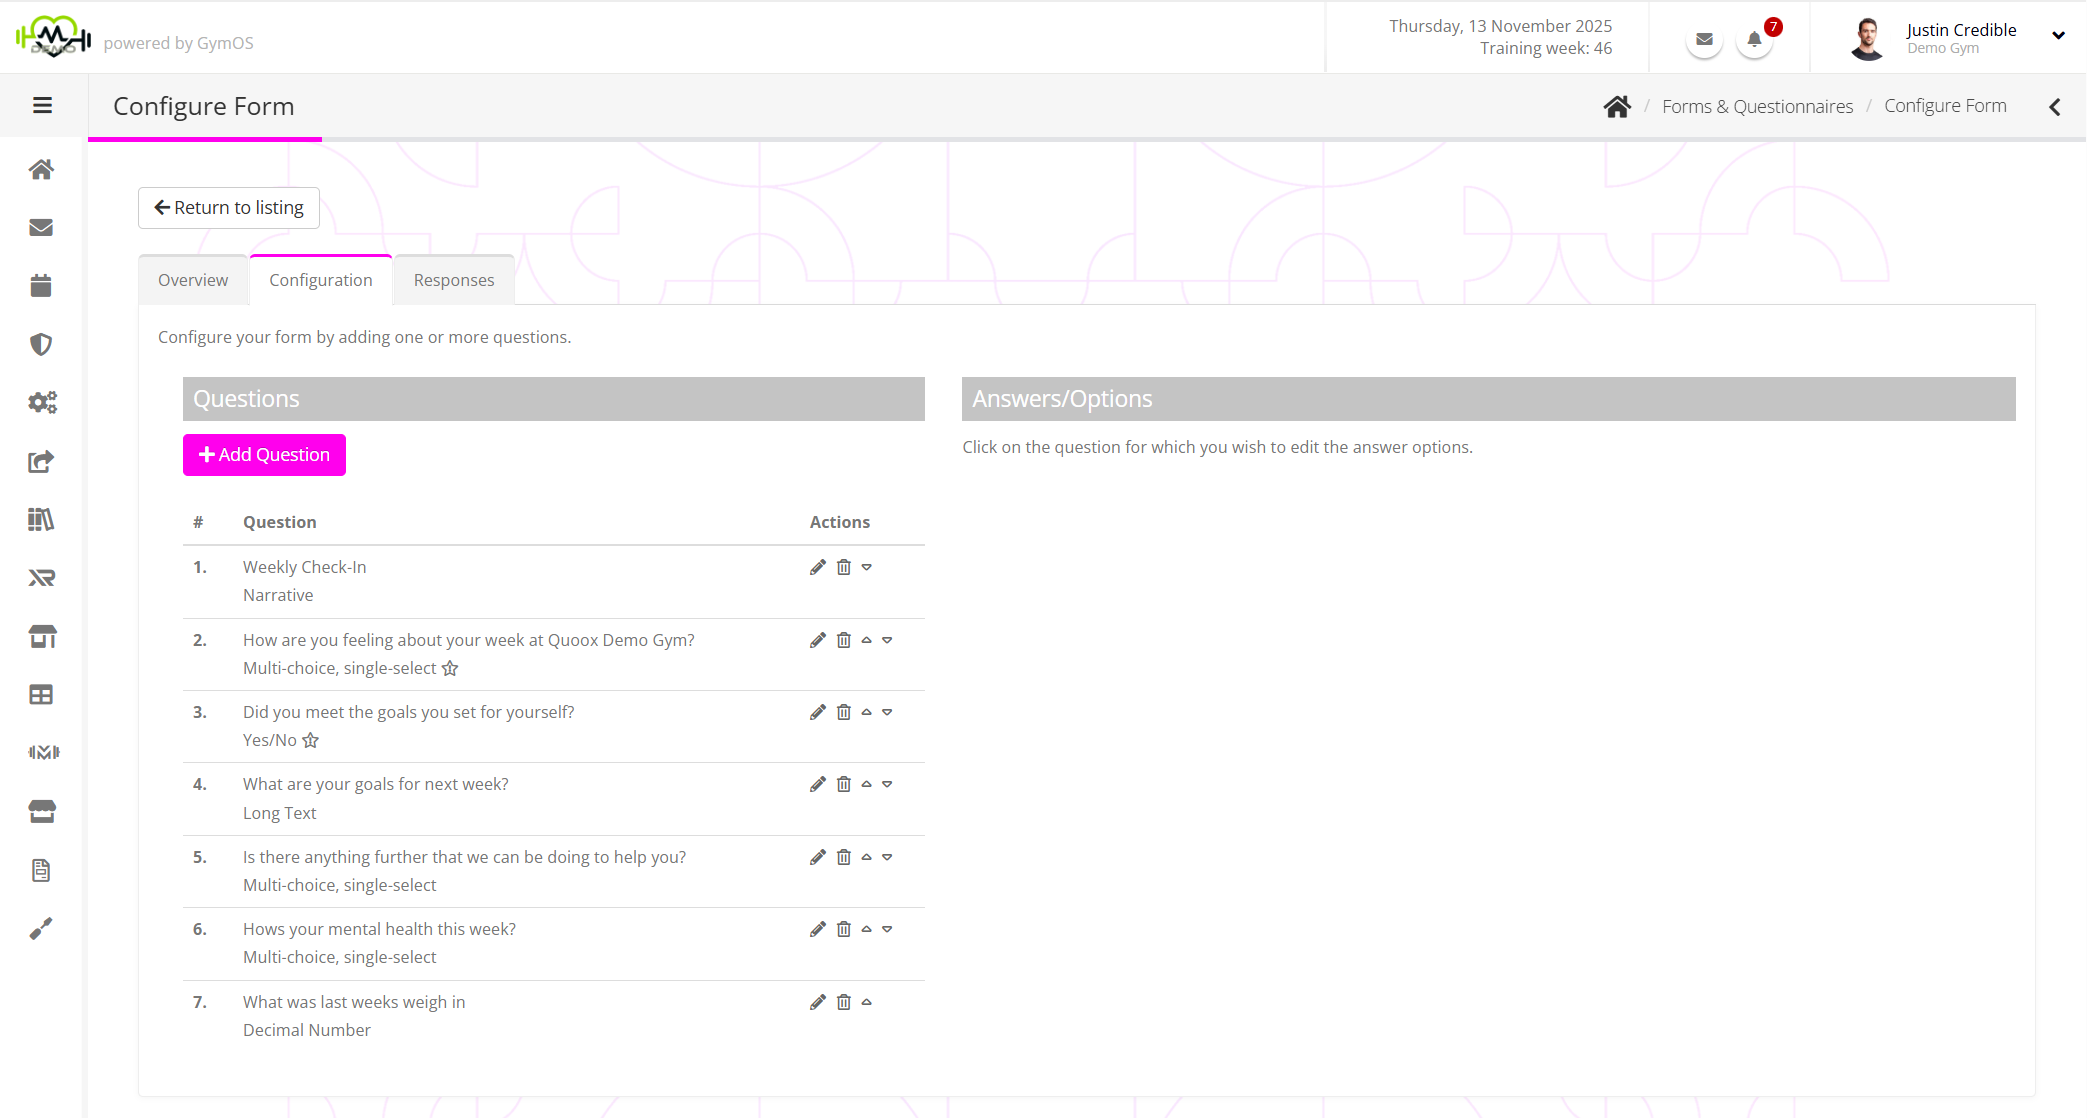
To add questions to your form, repeat the steps outlined below.
- Click the Add Question button. This will add a new row at the bottom of the existing questions.
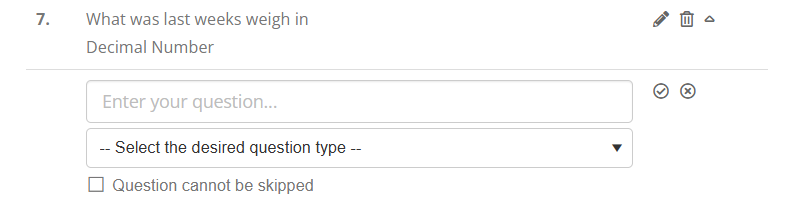
- Enter the question to be asked. (E.g., What are your goals for next week?)
- Select the desired question type. Learn more about form question types
- If you wish the question to be mandatory, check the Question cannot be skipped box.
- Click the icon to add your question, or the icon to abort adding the question.
The listing will refresh with the new question highlighted.
- Many of the question types will require further information. This configuration is done in the Answers/Options section on the right-hand side of the screen. Complete the options/configuration accordingly.
- Click Save Answers or Save to commit your configuration.
- The listing will refresh. If there are any errors with the configuration of your question, a corresponding icon will be displayed.
Repeat the process until you have added all of your questions.
- You may use the and icons to change the order of your questions.
- The icon will enable you to edit your question. (See notes below)
- Clicking will delete your question. (See notes below)
Once you have completed your form configuration, it is then ready for allocation to leads or members.

Question types
GymOS supports 18 different question types. These, along with their intended usage and configuration notes, are detailed below.
Date
The date option accepts a single date as an answer. An example use would be “What is your date of birth?”. It has no additional configuration.
Date and time
The date and time option includes both date and time elements. An example use would be “When is your first session with us?”. It has no additional configuration.
Decimal number
A decimal number permits non-whole numbers. An example use would be “What is your current weight (in kg)?”. It has no additional configuration.
Dropdown
A dropdown provides a list of options, from which the respondent may select one value. An example use would be “Where did you hear about us?”. The dropdown option has a number of configuration elements.
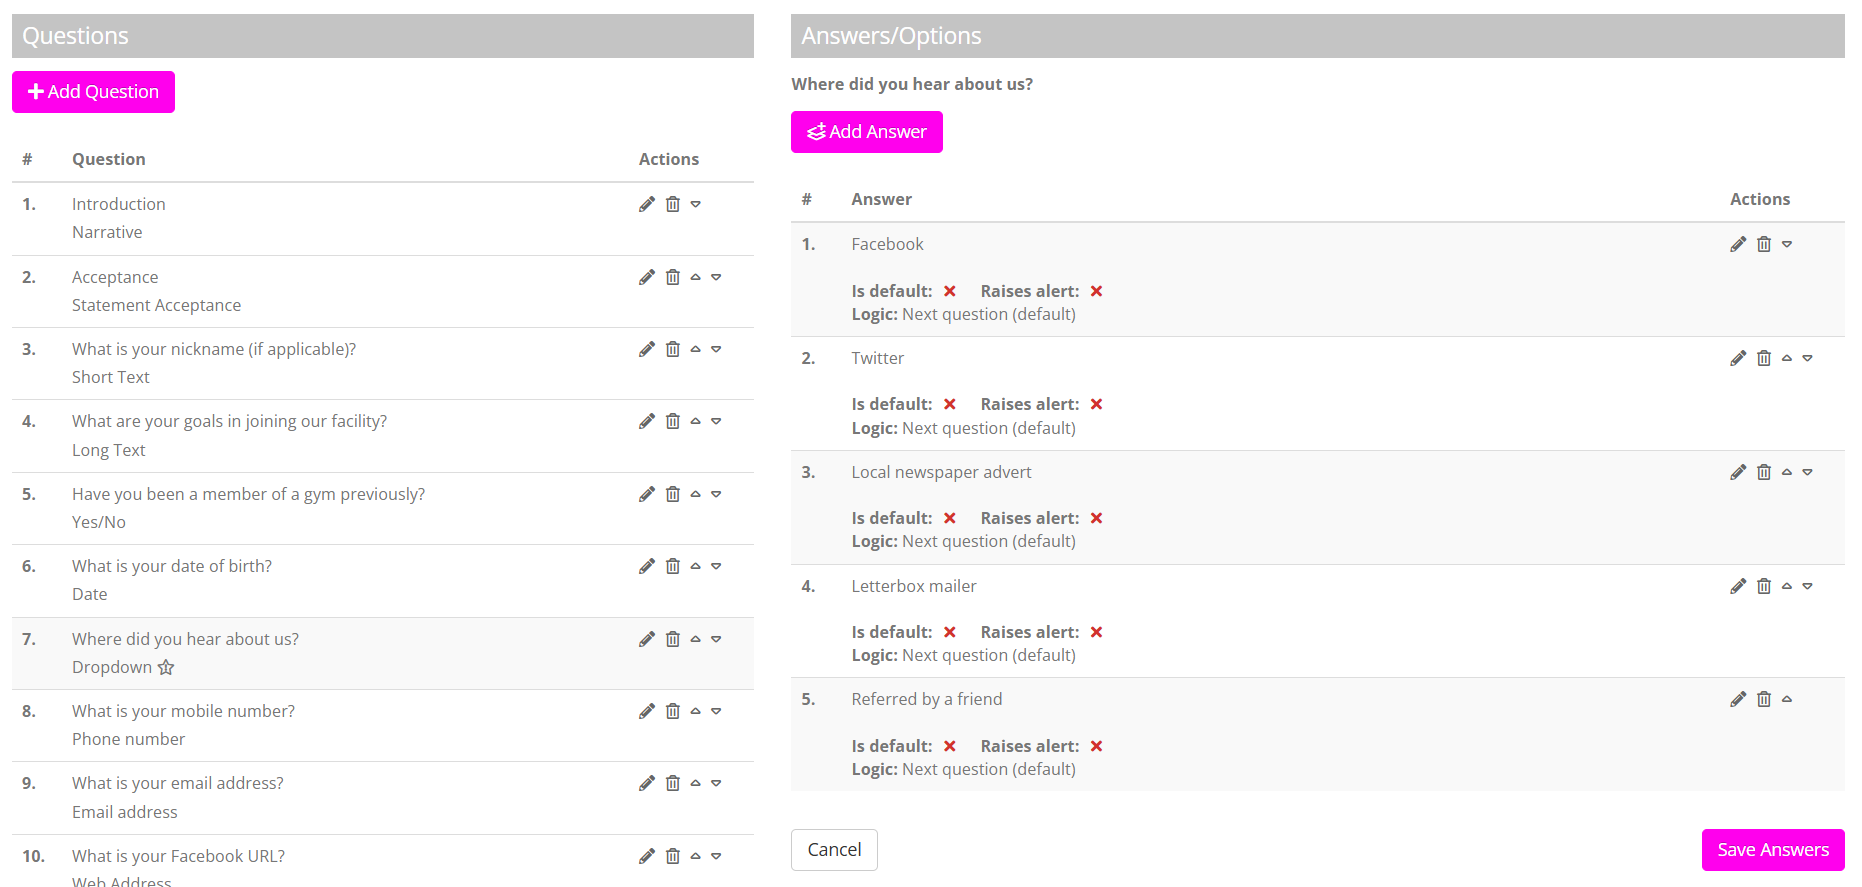
Click the Add Answer button to add a new answer to the dropdown. A new row is added to the bottom of the answers list.
- Provide the answer option in the text box.
- If you want this answer to be the default, check the Is default box.
- If you want an alert to be raised if the member selects this option, check the Raises alert box.
- By default, GymOS will ask each question in order. If you want to jump to a question later in the sequence when the member provides this answer, you may select the next question from the drop-down list.
Tip: Add all your questions first, and then go back through to apply the “jump logic”; otherwise, the chances are you won’t have yet added the question you want to jump to! - Having configured your answer, click the icon to add the next, or to abort.
- Click the Save Answers button to save your answers.
Email address
An email address permits the entry of text formatted correctly for an email address. An example use would be “What is your email address?”. It has no additional configuration. GymOS does not and cannot check to see if the address entered exists.
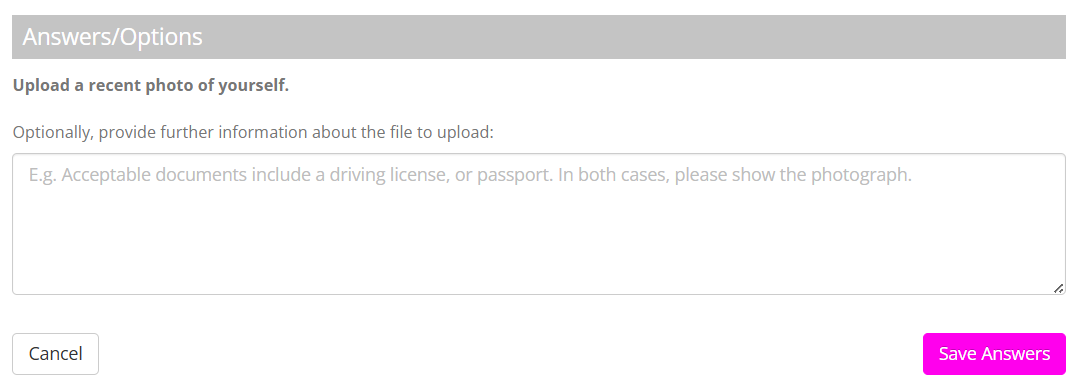
File upload
The capabilities of the file upload option vary, depending on the platform it is being used on. On a computer browser, the respondent will be able to upload a file from their device. On a mobile browser or in the GymOS FitnessHub mobile app, respondents will be restricted to uploading only images from their photo library.
When using the file upload option, you may optionally provide additional information about the type of file you want the respondent to upload. (E.g., “Acceptable documents include a driving licence or a passport. In both cases, please show the photograph.”)
Long text
A long text field provides a multi-line text input box for the respondent to answer the question. An example use would be “What are your goals in joining our facility?”. It has no additional configuration.
Multi-choice, multi-select
The Multi-choice, multi-select option allows respondents to make multiple selections from a list. It has configuration options that must be completed.
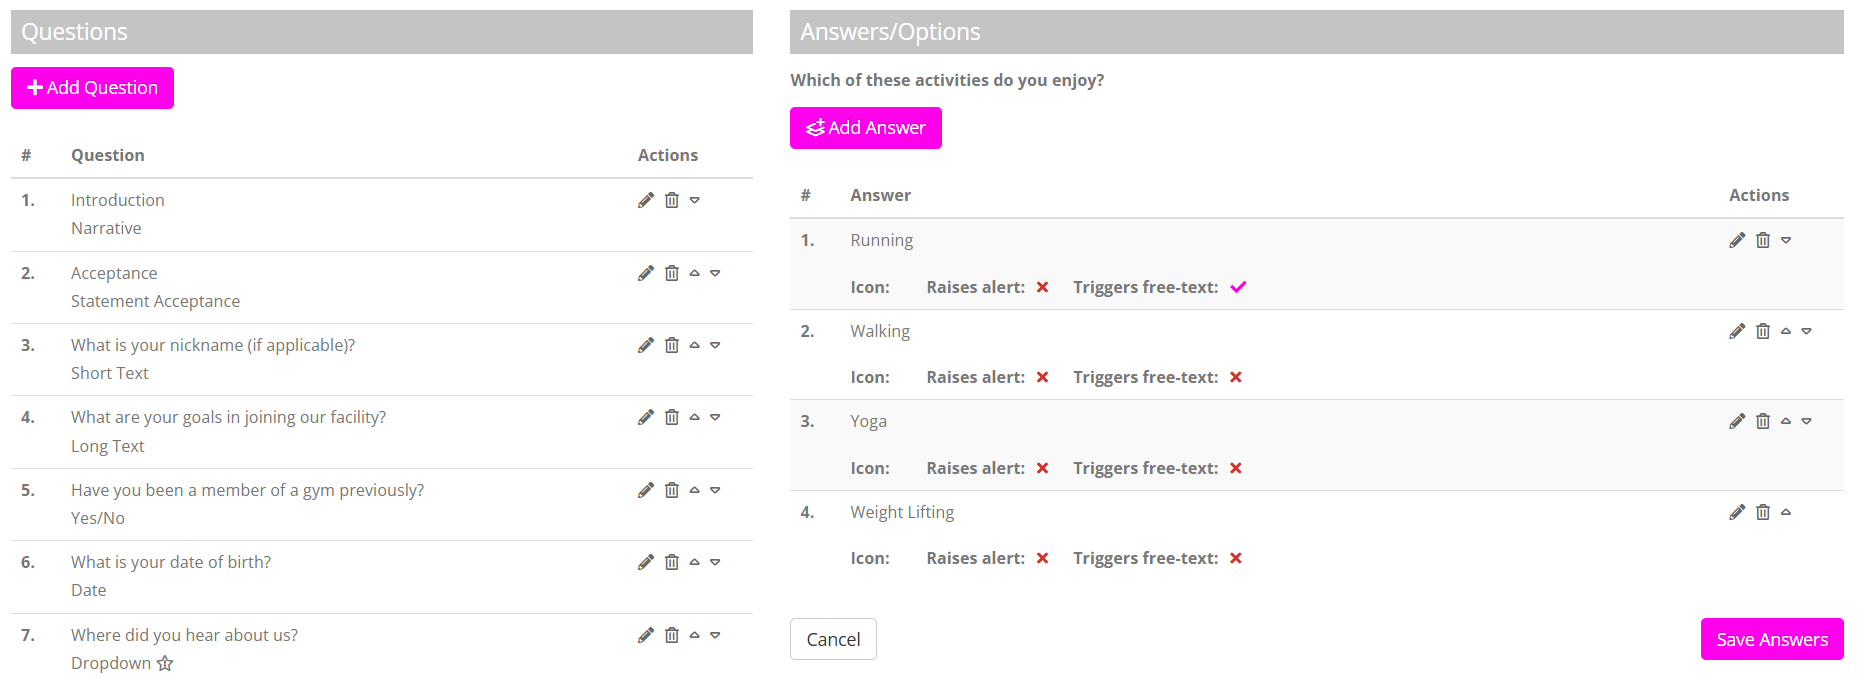
Click the Add Answer button to add a new answer to the multi-choice list. A new row is added to the bottom of the answers list.

- Provide the answer option in the text box.
- You may optionally select an icon to display alongside the answer, and choose the corresponding colour for it.
- If you want an alert to be raised if the member selects this option, check the Raises alert box.
- If you’d like to collect additional information from a respondent who selects this answer for a question, you can check the Triggers free-text box.
- Having configured your answer, click the icon to add the next, or to abort.
- Click the Save Answers button to save your answers.
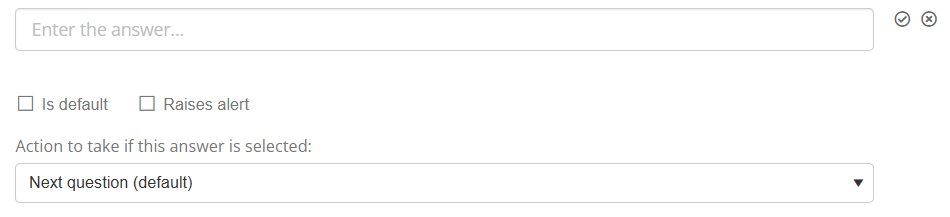
Multi-choice, single-select
The Multi-choice, single-select option allows respondents to make a single selection from a list. It has configuration options that must be completed.
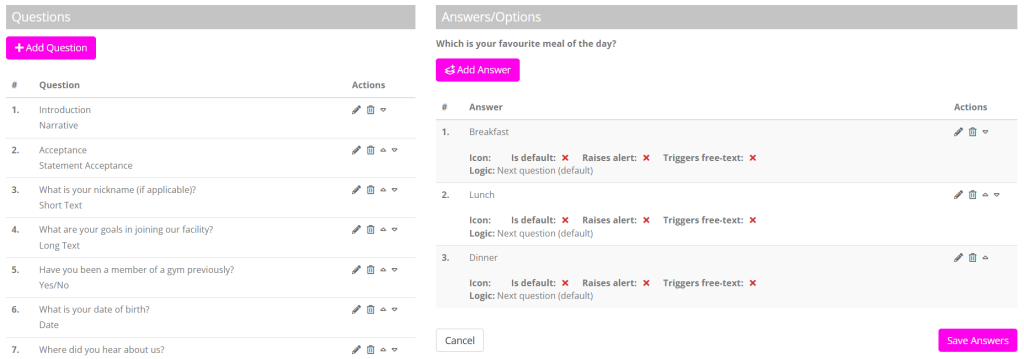
Click the Add Answer button to add a new answer to the multi-choice list. A new row is added to the bottom of the answers list.
- Provide the answer option in the text box.
- You may optionally select an icon to display alongside the answer, and choose the corresponding colour for it.
- If you want this answer to be the default, check the Is default box.
- If you want an alert to be raised if the member selects this option, check the Raises alert box.
- If you’d like to collect additional information from a respondent who selects this answer for a question, you can check the Triggers free-text box.
- By default, GymOS will ask each question in order. If you want to jump to a question later in the sequence when the member provides this answer, you may select the next question from the drop-down list.
Tip: Add all your questions first, and then go back through to apply the “jump logic”; otherwise, the chances are you won’t have yet added the question you want to jump to! - Having configured your answer, click the icon to add the next, or to abort.
- Click the Save Answers button to save your answers.
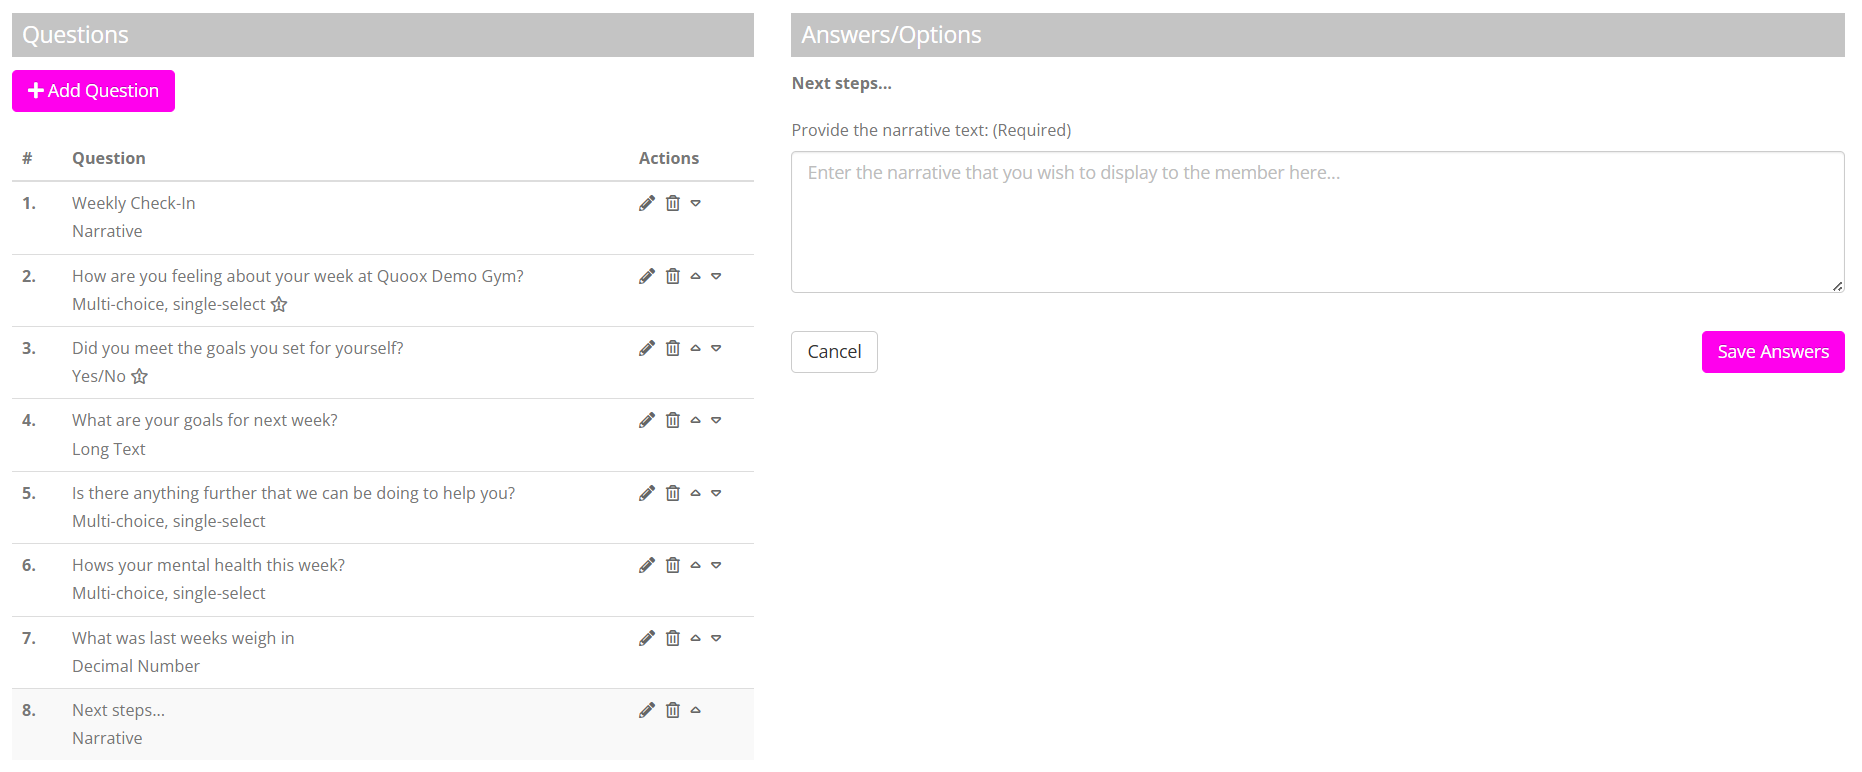
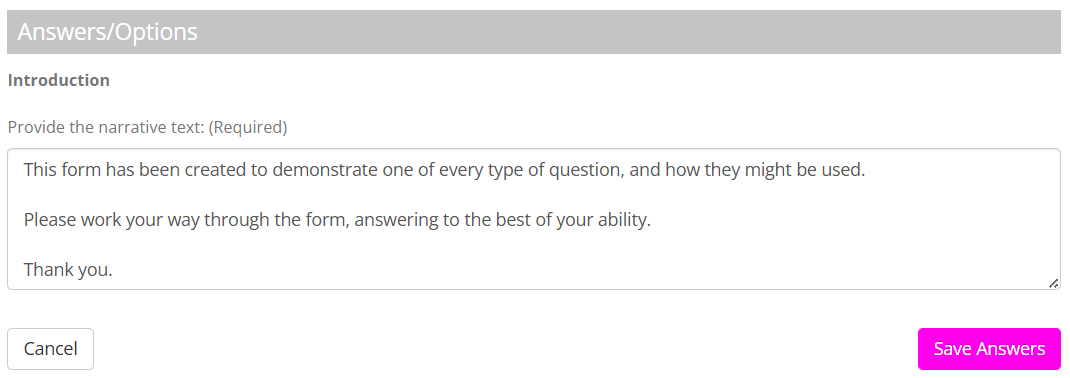
Narrative
The Narrative option helps provide a piece of information at some point within the questionnaire. The respondent doesn’t have to answer; they read the provided text. The configuration for this option involves providing the narrative text to display.
PDF Document Approval
The PDF Document Approval option is popular for having members approve their membership contracts or similar important documents. Subject to the device that they are using, the respondent is required to either sign their name or check a box to indicate their acceptance of the document terms. There are mandatory configuration options for this option.
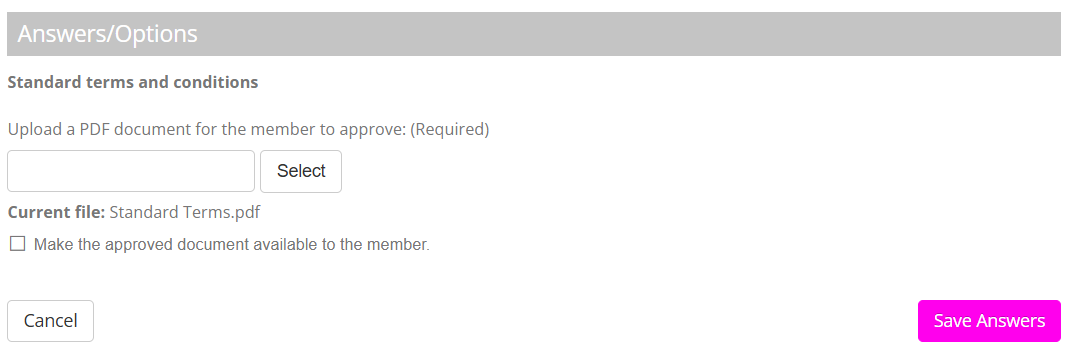
- Upload the PDF document that you’d like the respondent to review and approve. The maximum file size is 5Mb and we recommend keeping the file size as small as possible for people using mobile devices.
- If you wish the document the member has approved to be available to them in their document library once they complete the form, check the Make the approved document available to member box.
- Click Save Answers to upload your file.
Phone number
A phone number field provides a text input box for the respondent to provide a telephone number. An example use would be “What is your emergency contact’s telephone number?”. It has no additional configuration.
Short text
A short text field provides a single-line text input box for the respondent to answer the question. An example use would be “What is your nickname (if applicable)?”. It has no additional configuration.
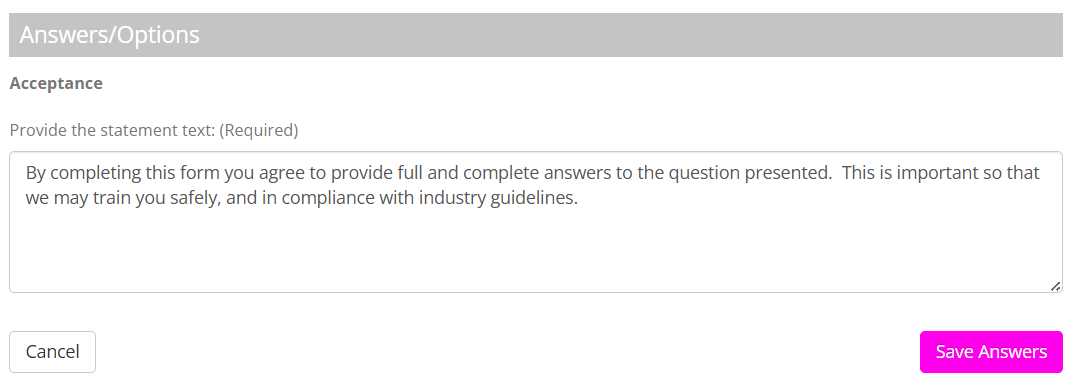
Statement Acceptance
The statement acceptance option is similar to the narrative option (above), except that the member has to click an “I agree” button to proceed. The configuration for this option involves providing the statement that the respondent is required to read and indicate their acceptance of.
Web Address
A web address field provides a single-line text input box for the respondent to enter a website URL. An example use would be “What is your Facebook profile URL?”. It has no additional configuration.
Whole number
A whole number permits whole, integer numbers. An example use would be “On a scale of 1-10 (10 being most excited), how do you feel about starting training?”. It has no additional configuration.
Word Document Approval
The Word Document Approval answer type enables you to summarise and boilerplate the answers provided to a form in a PDF document. This document may then be made available to the member in their document library, optionally.
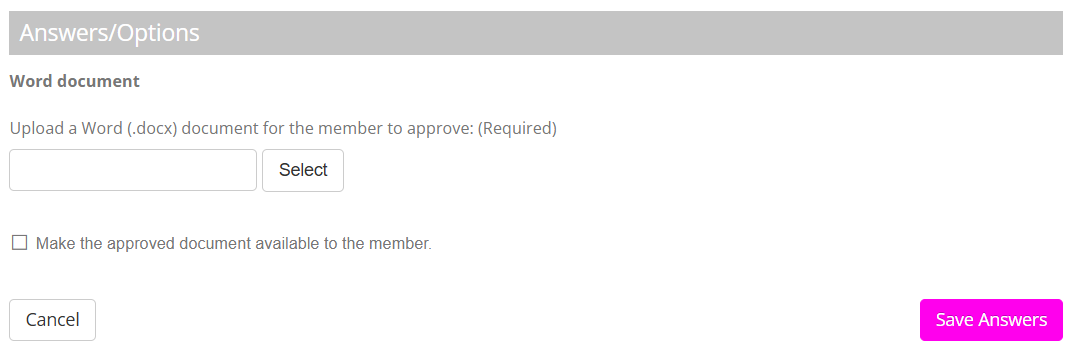
Details on how to configure the Word Document are described in the Summarise a form for approval in a PDF document article.
Upload the Word (.docx file, maximum 5Mb). Check the Make the approved document available to the member box if you wish the member to have access to a copy of the document they approved.
Yes/No
The Yes/No option provides the two options “Yes” and “No” from which the respondent may make a selection. It has no additional configuration.
Amending an existing form
Amending an existing form is very similar to the creation process, but we recommend that you firstly read and consider the warning below.

To amend a form:
- Select Forms & Questionnaires from the Connect and Promote section of the main navigation menu. This will open the forms listing page.
- Click the icon alongside the form of interest. This will open the form editing page.
- Make the changes that you require, ensuring that you click the corresponding Save buttons as appropriate.